
Level 1 – Basic Hold
This basic tying option offers the least amount of hold for your hourse.
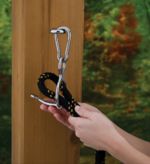
Step 1-1
After installing the Blocker Tie Ring, double-up the lead rope approximately three feet from the snap end and make a loop. Insert the loop through the large ring of the Blocker Tie Ring. Next, push the tongue of the Tie Ring up through the loop in the rope.

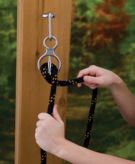
Step 1 – 2
Pull both ends of the lead rope straight down to lock in place.
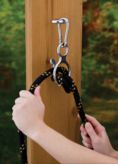
Level 2 – Medium Hold
Offers more support and hold for your horse.
Step 2-1
Starting with your lead rope tied at Level One, bring the loose end of the lead rope behind the snap end of the lead rope.
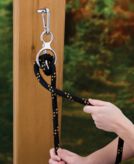
Step 2-2
With your finger, push the Tie Ring tongue out. Bring the lead rope up and behind the Tie Ring and down over the tongue, making a circle.

Step 2-3
Grasp the end of the lead rope that is attached to your horse and pull down to lock in place.
Level 3 – Maximum Hold
Offers the most hold and support for your horse. If you can’t pull the lead rope through the Tie Ring, you probably are using more hold than necessary.
Step 3-1
Starting with your lead rope tied at Level Two, grasp the tail end of the lead rope that is attached to your horse. This creates the most hold possible while still allowing a release.